Showing posts with label The Open Sea. Show all posts

Wednesday, February 25, 2015

Guest Card Maker

Hi there, everyone!

It's the Blog Hogger with three . . . that's right THREE . . . cards made by a mystery stamper named Lisa. Oops! Guess she's not a mystery anymore, is she? Well, at least I didn't give her last name! LOL

Anyway, Lisa was at my house last week making cards with me and, in the time I made one card, she made three! What?!  :)

She did point out that all her cards had the same design, which they did, but she used different stamps and designer paper for each of them. It's a great example of how switching the stamps can make quite a difference. She agreed to let me post them so here they are:


The first one features the "Feeling Sentimental" stamp set, which was offered in the Sale-A-Bration flyer last year, or possibly the year before.

Don't forget that Sale-A-Bration is still on and you can get the cutest stamps and products . . . for FREE when you place a $60 order!!!

Lisa used Chocolate Chip ink with Very Vanilla cardstock and an adorable designer paper.

Here's the second one:


This one features "The Open Sea" stamp set, with Whisper White, Soft Sky and Island Indigo cardstock. She also used two ovals from the Ovals Collection Framelits.

And now for the last one:


This one features the "Happy Moments" stamp set, with Whisper White cardstock.

So now, you know that if you see a card you'd like to CASE (Copy And Share Everything) but don't have the stamp set, you can put on your creativity hat and use a stamp set you do have instead!

Creative hugs,
Colleen


Sunday, June 15, 2014

Male Card

Hey there, all you people who dabble in ink!

It's the Blog Hogger with a lovely male card and, given the fact that today is Father's Day, I'll bet you expect it to be a Father's Day card! While that's not illogical thinking on your part, it's actually a birthday card for my husband.

See, my husband's birthday, Father's Day AND our anniversary are all within a week's span in June. Does this means he gets three great gifts? Heck, no! It means he gets one really nice gift! lol On the other hand (and totally inconsequential to this blog posting), Mother's Day is in May, our anniversary is in June, and my birthday is in July. Three months. Three separate gifts! Woohoo! :)

And now back to your regularly scheduled programming blog posting . . .

Here's the card I gave him for his birthday on Friday, the 13th (which for him is not an unlucky day):


Details:

  • The cardstock is Real Red (his favourite color), Whisper White, and an old piece of textured blue cardstock. (You can easily substitute Marina Mist run through an Embossing Folder.)
  • The ink is Black Stazon and Smoky Slate (on the white strip).
  • The stamp set is The Open Sea.
  • The extras are Cherry Cobbler Baker's Twine and Marina Mist Candy Dots.
There you have it. A simple, yet effective, male card. I'm pleased to say that my husband was smart enough to take a good long look at the front of the card and comment that it was beautiful (although he may have used the words "really nice"), before he opened it up to read the inside! lol

Have a great day, everyone!
Colleen


Sunday, June 30, 2013

Ships Ahoy, Matey!

Hi there!

It's the Blog Hogger here, again. Has anyone - besides me - noticed that when I blog, it is in clusters? I wonder how much that bugs Kathy? I'm sure she'd be happier if I was consistent but . . . I'm not! lol

Anyway, remember when I posted the picture of the card and box set I made for someone at work? Oh, wait! That was only yesterday! lol

Anyway, in case you've just found this marvelous little blog, here's a picture of them:


Today I want to share another set I made . . . for another person leaving our office! This one features The Open Sea stamp set.


Here's a close up of the card (with the colors looking different due to a change of angle when I took the picture):


For those of you who follow this blog closely, you might notice the center of this card is one I've shown previously, complete with directions for making it.

As with yesterday's card, I took a card front that was 4 1/4" x 5 1/2" and expanded on it so that I ended up with a 5" x 7" card. This time I added a So Saffron cardstock (cs) layer and some Marina Mist cs run through the Big Shot using some random embossing folder.

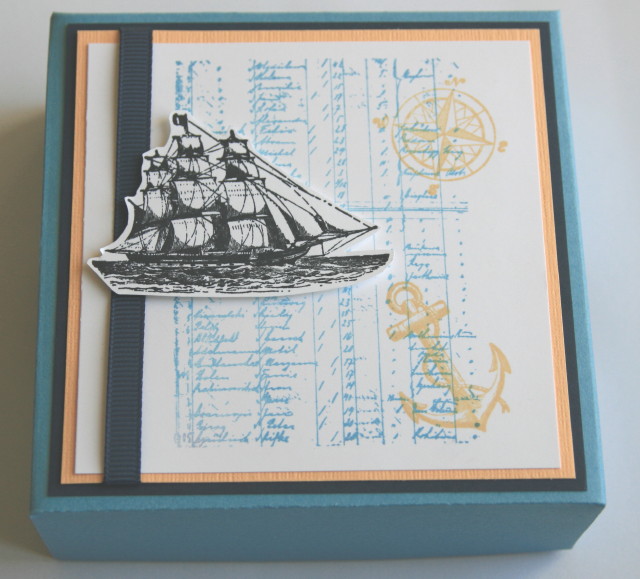
Here's a close-up of the coordinating box:


I didn't want this to be too matchy-matchy because it was for a guy. lol  However, I used the same colors of cardstock and The Open Sea stamp set. I cut the ship out and popped it up using Dimensionals.

Why did I showcase this card today? Since it's another rainy day here, it seemed appropriate to feature a marine theme! lol

Sailing away hugs,
Colleen, aka Kathy's sister

Thursday, May 23, 2013

Challenging the Brayer Queen!

Good Day Stampers!

I am heading to the Falls to help set up the trailer for the summer.   Although I was gone today and will be gone again tomorrow,  I have been busy making cards for my "You've Got Male!" class this Monday. 


The title of this post is Challenging the Brayer Queen (aka - the Blog Hogger, my sister, Colleen)  She has been doing some amazing work with her brayer and has challenged me to "Brayer Up!"  So I headed to Michelle Zindorf's website, the home of the original Brayer Queen.  This lady is amazing with a Brayer.  Her cards are literally works of art. 

I found a tutorial using "Open Sea" and with a class coming up thought I would give it a try.  Of course in order to teach it you have to learn it right?  So after only two tries I finally got something I am quite proud of.  Have a look -

I used Basic Black for my card base and some wonderful dsp from the This and That bundle.  I started out with a 3" x 3" piece of Whisper white card stock.  After brayering and stamping and some direct to paper this is what I have.  I followed Michelle's tutorial to the letter or a close as I could.  You can find the tutorial here!
 
Her tutorial will give you an idea of what I did way better than I can explain it to you.  So, Colleen,  I have taken up the challenge and am currently working on another one to post soon.  Let's see if I can keep up with the Blog Hogger!
 
This is a quick post as I have some things to take care of before tomorrow.  Laundry and a meal plan for the weekend.  It's calling for rain but no snow!  We can but hope!
 
Sailing away Hugs!

Monday, May 20, 2013

My New Friend!

Hi there!

It's the Blog Hogger again with an update on my newest, greatest, most fabulous friend!!! Woohoo! (Now, for all of my other friends out there, don't despair! I still count you as friends, albeit just not as much fun! lol)

So, who's my new friend? Just scroll down to see . . .


I love, love, love my brayer! (Wow! I never thought I'd say those words!!!)

See the pretty card she helped me make?


I actually made a picture tutorial to share with you.

Supplies:

  • The Open Sea stamp set
  • Night of Navy, Marina Mist and Whisper White cardstock (cs)
  • Soft Sky, Marina Mist, Island Indigo, So Saffron, Night of Navy, Whisper White Craft and Black Stazon ink
  • post-it notes, White Gel Pen, 1" circle punch, sponges, brayer (preferably one with big eyelashes) lol

I cut a piece of Whisper White cs 3 1/2" x 4 3/4". Then I punched a 1" circle out of a post-it note and sponged So Saffron ink into the resulting hole to make the sun. (Careful: Don't make it too dark. I did and had to lighten it later using White Craft Ink.)


Next I covered up the sun with the punched out part of the post-it note. Then using a larger post-it note to cover up the bottom 1/2 of the cs, I used my brayer to ink up the sky with soft Sky ink, starting at the top and working toward the post-it note.


Then I flipped the cs over and used the brayer from the other side. (I did this because the circular post-it piece was causing the ink to come out darker on one side than the other.) Again, I worked from the top of the sky toward the post-it note "horizon".


Next, I re-positioned the post-it note so that it covered the sky and brayered Marina Mist ink onto the cs starting at the bottom and working toward the post-it note.


I did the same thing with Island Indigo ink, keeping it to the bottom of the cs. (Be careful: The Island Indigo ink is very dark and you don't want to cover up all the Marina Mist.)


Next I sponged a bit of Soft Sky onto the horizon so there would be more of a definition between the sea and sky. I used the post-it note to make sure the line was sharp.

Then I used the corner of the Marina Mist ink pad to make some lines across the Marina Mist to simulate waves.


Note: This next step doesn't have to be done if you kept the sun very light in the first step. I felt mine was too dark so I used White Craft ink and a sponge to lighten the sun. Yes, I went outside the lines but it gave the sun a softer look.


I finished up by inking up the ship from the The Open Sea stamp set, trying to avoid the "sea" section on the stamp. A little bit of it showed up anyway so I used a sponge and Whisper White Craft ink to lighten the effect further and it ended up looking like a shadow of the ship in the water. Then I sponged a bit of Island Indigo underneath the ship.

I made some highlights using the White Gel Pen, sponged around the sky with Marina Mist ink and sponged around the edges of the sea with Night of Navy ink.

Then I used a Night of Navy card base cut at 5 1/5" and scored at 4 1/4", and a Marina Mist section cut 4 7/8" x 3 5/8". I stamped another ship, cut it out and mounted it on Dimensionals over the original ship.


And there you have it! I'm getting more comfortable using the brayer and having fun in the process.

Rolling hugs,
Colleen, aka the Blog Hogger