Showing posts with label Lovely as a Tree. Show all posts

Sunday, August 30, 2015

"Welcome Baby" Card with a Twist!

Hi, everyone! It's the Blog Hogger here with a different twist on a baby card.

One of my nieces had a baby boy this past Tuesday. I had planned to make a card for the parents, of course, but couldn't decide on a design. My niece is definitely not a 'girlie' girl, so a typical card just didn't "speak" to me. (Yes, I know cards shouldn't speak to me but...they do! It's a Stampin' Up thing! lol)

I know one of her favourite things to do is go hunting and she's very into camouflage clothing. She even bought a camouflage onesie for Kayden, my shiny new grand nephew. So...I decided to incorporate hunter's camouflage into the design of the card! That's an idea verging on brilliant but, not surprisingly, awkward to do! lol

(This is one of the reasons I like making my own cards. I'm pretty sure you wouldn't be able to buy a personalized card like this!)

I ended up doing a screen divider card with the back panels featuring camouflage. It took a lot bit of fiddling to come up with something I was happy with, but I'm satisfied with the final design.

And here it is:


Here's a close up of the first two panels:


And here are the last two panels:


I used the tutorial from Splitcoaststampers to make the screen divider card. I found the tutorial here: http://www.splitcoaststampers.com/resources/tutorials/screendividercard/

Here are the details for making the camouflage panels;

  1. Sponge random splotches of Chocolate Chip, Old Olive and Pumpkin Pie ink on Crumb Cake cardstock.
  2. Random stamp the top of the evergreen tree and the leaf stamps from the Lovely as a Tree stamp set. (Stamp off onto a piece of scrap paper any stamps inked up with Pumpkin Pie ink so the color doesn't come out too strong.)
  3. Draw random branches onto the panels and highlight the sides with a White Gel Pen.
I used images from some long retired stamp sets (Greetings Galore, Punch Bunch, Happy Moments and For a Friend). I also used the Small Oval and 3/4" punches to make the balloons. The bottom of the balloons were made using a foot from the Owl Builders punch.

I coloured the images using Chocolate Chip, Old Olive and Pumpkin Pie markers. All the images are popped up on Dimensionals. I finished the card off by covering all the images, including the balloons, with a coat of Crystal Effects, thereby giving them a nice glossy, 3-D effect.

I glued another Very Vanilla panel on the back of the balloon panel, so I'd have a place to write my sentiment. (All of the images were stamped onto Very Vanilla cardstock, although it looks like Whisper White in some of the pictures.)

I'm hoping my niece really likes this card, especially when I include a note telling her a cheque has been "camouflaged" into the card. I couldn't resist teasing her a bit and left the side of one of the panels open so I could insert the cheque into it! And I'm not even telling you which panel it is! lol

Well, that's it for now, fellow stampers!

Camouflaged hugs,
Colleen

Sunday, May 31, 2015

Open Season on Man Cards!


Good day Stampers!


Well June is almost here and you know what that means, right?  Yup, it's time to make man cards!  With Father's Day on June 21st. We have to haul out the darker colours!  Yeah think, dirt!  For some inexplicable reason men are not into flowers or ribbon or even bright pinks!  I mean really!  

So I have a new class designed to help you make that transition from gojus to ho hum!  

Have a look at a couple of cards I have in mind for this class!

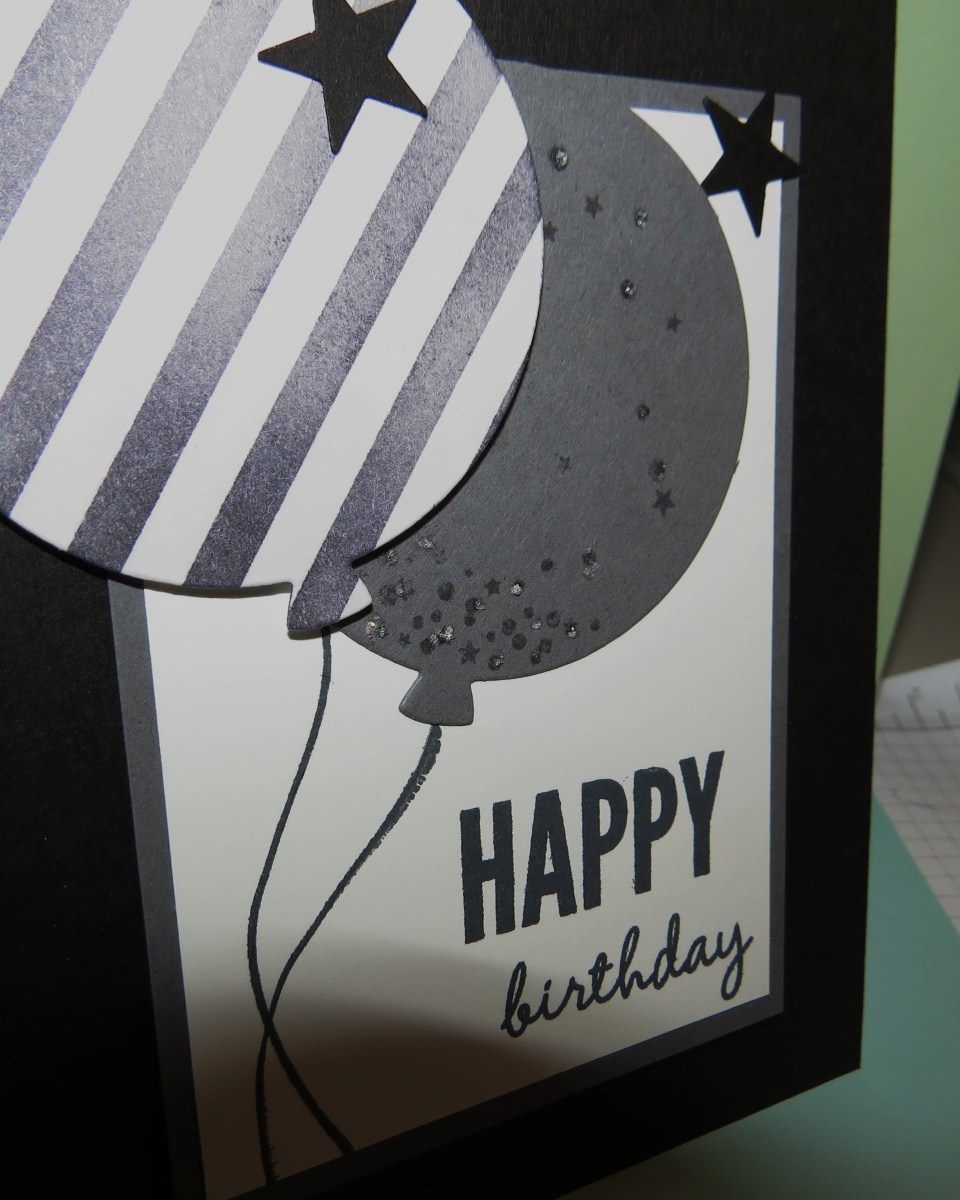
First up is this gojus (surprise I can use this word here cause it is very lovely in person)

 
This card uses dark colors to make an impact.  And yes you do see some glitter.  This is very much an elegant card!  I used Basic Black and Basic Grey for my colors and the stamp set is the new Photopolymer set called "Celebrate Today!"  I found this gem on Pintrest and thought it was just perfect for my theme of man cards.
 
 
Here is a closer look at the balloons! 


This next one uses "Lovely as a Tree" which is ALWAYS my go to set for men!  Pair that with Greens and Browns and you have a hit with the gentlemen!  This card is mounted on a Chocolate Chip piece of card stock sized at 5 1/2" x 4 1/4".  then the image and front are sized just a 1/4 " smaller.  Just thought I would change it up a bit from the standard card. 

 
This is the inside of the card.  I used "Hardwood" for the front stamping and also the circle framelits to create an aperture in the front of the card.  This card uses Always Artichoke and Very Vanilla for the accent colors.  This card is suitable for either a Birthday card or Father's day! 
 
Well that's what I have for you today.  Stay tuned for two other lovely cards (oops, manly) cards that finish off this set. 
 
Have a wonderful day and enjoy the sunshine (or rain) depending on you area of the world.
 
Getting it right hugs!
 

Thursday, November 6, 2014

Twins? Yes! No!

Hi, everyone!

It's the Blog Hogger! Today I want to share with you two cards I made for my twin nieces. They are turning 20 years old next week.

If any of you have twins in your families you'll understand that, although they may look alike, they have very different personalities! When they were little, their mom dressed them the same, although each had favorite colors they liked to wear. Once they hit their teen years, however, that went out the window and they experimented (and continue to experiment) with, among other things, different hair colors. One likes the outdoors, hunting and all things country, while the other is girlie and enjoys doing her nails, makeup, etc.

So, of course, their birthday cards needed to express their individual styles..

Here's the first card:


I made the rectangle with Soft Suede ink applied directly onto a size 'D' clear block. Then I stamped a tree from the "Lovely as a Tree" stamp set over it using Chocolate Chip ink. As (hopefully) you can see, I used some silver and gold emboss powder to highlight random sections of the tree. The cardstock used is Chocolate Chip, Crumb Cake and Whisper White.

Here's the other card:


This one uses Chocolate Chip, Blushing Bride and a scrap of Whisper White cardstock. I also used Chocolate Chip ink and some random Designer Paper. My favorite part of this card is the "icing" and "candle" punched out using the Cupcake Builder punch and Silver Glimmer Paper.

Here's a shot from the side so you can see how it, and the designer paper, shimmers:


So, are they for twins? Yes! Are the cards the same because of that? No! Titled explained! lol

Individual hugs for everyone,
Colleen

Monday, October 28, 2013

Creepy..Yet Beautiful...Card!

Hi there! It's the Blog Hogger again.

Yesterday I related a little tale about a disembodied voice, who was actually my friend Wilhelmena connecting via her iPad. I heard from her today. She thinks I'm crazy...but she still wants to be my friend so it's all good! lol

Anyway, she sent me a picture of a card she made last night and I wanted to share it with you.


Details:

  • Stamp set is "Lovely as a Tree"
  • Cardstock is Basic Black, Daffodil Delight and Whisper White
  • Ink used is Basic Black (the background trees), Daffodil Delight (the sponged moon) and Versamark (used with Black Emboss Powder to make the foreground trees), Wisteria Wonder (although the "mist" looks black in this picture, it's actually a purple colour) and Real Red (sentiment)
  • Extras used were a post it note, a circle punch and sponges
And now I'll leave you with another Halloween cartoon............


Halloween hugs,
Colleen

Saturday, January 5, 2013

Sparkly Tree!

Just a little note everyone, Colleen has had this card on drafts and I was going to post a new project but unfortunately Blogger won't let me up load my pic's so I am falling back on lil sis.  Thanks!  Enjoy!
Katherine

Hi everyone,

It's me again, your friendly neighborhood Blog Hogger!

While I make my own cards, I'm not a card snob. I will look at store-bought cards occasionally and sometimes draw inspiration from them! (Okay, let's all pause for a collective gasp of disbelief! lol)

A couple of evenings ago I was visiting a friend and saw a very beautiful, understated Christmas card sitting on her shelf. After taking a close look at it, it percolated through my mind for a while, and this is what popped out:


Here's what I did;
  • I cut the back from Old Olive cardstock (cs) at 5 1/2" and scored at 4 1/4".
  • The Whisper White cs is 5 1/4" x 4".
  • I inked up the large tree image from the Lovely As a Tree stamp set with Versamark Ink.
  • Then I inked it up with Certainly Celery ink. The darker spots are randomly "thumped" on with an Old Olive marker.
  • I ran the Emboss Buddy over the cs and then stamped the image.
  • I used Iridescent Ice Emboss Powder and the Heat Tool to create the sparkly effect.
  • Then I used Tombo Glue and some white glitter I bought years ago to put snow on the "ground" and sporadically in the tree. (It's just dabbed here and there since I didn't want to cover up the whole tree. Gotta let that sparkle shine! lol)
  • I stamped the greeting, which is from the Many Merry Messages stamp set, in Old Olive ink.
  • I finished up by popping the Whisper White layer up using Dimensionals.
I love the soft, shiny look and can easily see using this template for a birthday or 'thinking of you' card. It's also beautiful without the "snow", which means it could be used year round!

Sparkly hugs,
Colleen

Wednesday, September 26, 2012

Ode to Green!

Hi all you inky people,

It's the Blog Hogger again, coming to you from friendly card-making land! lol Now Kathy may think she's getting her blog back all to herself but I know her password so I'll keep on blogging . . . until she changes it! lol

Speaking of her password, every time I do a posting I have to enter a password that is a combination of 14 letters and numbers! What's up with that? Seriously, I can feel myself age each time I type it in! It's actually takes less time for me to type the posting!!! lol Anyway, if anyone needs some help learning how to choose passwords that are unpredictable . . . and long . . . thereby frustrating hackers, just contact Kathy! lol

There, now that I have my rant out of the way, my next card is called . . . you guessed it . . . Ode to Green! Recently we have been having cooler, rainier weather and I can feel our lovely summer slipping away. Sigh! Therefore, I just had to do a card that shows my appreciation to Mother Nature for the wonderful work she does. lol

It's simple, it's clean, it's green . . . and here it is:


And here's a picture from the top:


Here are the details:
  • I cut Always Artichoke cardstock (cs) at 4 1/4" x 11", and scored it at 5 1/2".
  • The Certainly Celery layer is 4" x 5 1/4".
  • The Whisper White layer is 3 3/4" x 5".
  • I used the Lovely as a Tree stamp set and stamped the row of trees in the middle of the Whisper White cs.
  • Then I cleaned and dried the stamp really well (an important step so that the trees on either side of the middle tree don't leave a faint trace in the next step).
  • I prepared a scrap piece of Whisper White cs by rubbing it lightly with my Embossing Buddy.
  • Then I inked up the middle tree using my VersaMarker.
  • I colored the image all over using a Certainly Celery marker. Then I used a Chocolate Chip marker to touch up some of the trunk and branches. I just lightly dabbed the marker onto the stamp.
  • Then I used the Always Artichoke marker to randomly tap some more color onto various spots on the tree.
  • After stamping my image, I covered it with Clear Emboss Powder and, using my Heat Tool, I embossed the image.
Here's a close up of the tree to give you a visual of what I did:


  • I punched out the tree using the Extra-Large Oval punch.
  • I ran a scrap piece of Always Artichoke cs through the Big Shot, using the oval shape from the Designer Frames Folders.
  • I cut around the frame by hand, glued the tree to the center and popped up the image using Dimensionals.
I know it seems like a lot of steps, but it was actually a very quick card to make. M-u-c-h quicker than typing Kathy's password! (I wonder what kind of password she would have picked if she was protecting something of national security? lol)

Teasing hugs,
Colleen, aka the Blog Hogger

Wednesday, June 13, 2012

Emboss Painting Elegant Card

Hi there everyone,

It's the Blog Hogger coming to you with a picture tutorial of a technique Kathy taught me, called Emboss Painting.  It looks impressive but, using Kathy's tips, it isn't hard to do!  (Seriously, folks, isn't that what appeals to all of us card addicts? lol)

Although I've seen this technique elsewhere, it always ends up with mixing up some of your embossing powder, and that results in throwing it away.  Kathy's technique keeps each color of emboss powder in it's own container so there's no wastage!  She's a genius!  lol

First, here's the card:


The Emboss Painting technique will show you how to make the tree that's black, silver and gold!

Supplies needed to make this card:
  • Basic Black and Very Vanilla card stock (cs)
  • Black, Silver & Gold Emboss Powders
  • One straw (Yes, I said "straw"!  lol)
  • 1/4" Very Vanilla ribbon
  • 1 3/8" x 5/8" Oval punch (which is the smaller of the two punches & is no longer available)
  • Large Oval punch
First, cut the Basic Black cs 5 1/2" x 8 1/2" and score at 4 1/4".  Cut a piece of Very Vanilla cs 5 1/4" x 4".  Cut another piece of Basic Black cs at 3/4" x 5 1/4".  Cut a piece of ribbon approximately 7 1/2" long.

Referring to the picture below, rub your Emboss Buddy across the piece of Very Vanilla cs and, using Versamark Ink to ink up your stamp, stamp the long stamp from the Lovely as a Tree stamp set.  Do this twice, so that the image of the trees come off the ends of the card stock.  Emboss with Gold Emboss Powder.

Attach the ribbon to the narrow strip of cs, using Snail Adhesive to adhere the tape to the back of the cs.


Go ahead and assemble these pieces, using the picture of the completed card for placement.

Now comes the fun part!  Cut your straw in half, using a diagonal cut, so that each piece has a pointy end.  Look at the picture below to see what I mean.


Next, run the Emboss Buddy over a piece of approximately 2 3/8" x 4" Very Vanilla cs.  (I approximated the width of the cs because I rarely stamp an image . . . especially using a wood stamp . . . completely in the middle without using a Stamp-A-Ma-Jig.)  Stamp the tall tree from the Lovely as a Tree stamp set, using Versamark Ink.  Using the pointy end of one the straws to pick up some of the Black Emboss Powder, lightly tap some of the emboss powder onto random spots of the image.  (Good news!  Precision isn't needed here!  The completed image will look slightly different each time.)


Then flip the cs over the container you keep your emboss powder in (you'll see what I use in the next two pictures), or whatever you use to catch your emboss powder, and tap the back of the cs to knock off any loose powder.   (The trick here is to "flip", as apposed to sliding the powder off.)

Next, repeat with the Silver Emboss Powder.  Again, flip the cs over your container and tap the back.


Now you can use a spoon to cover the rest of the image with Gold Emboss Powder, sliding the excess off into your container and tapping on the back to remove any excess.


This is what your image should look like.  (Remember, each image will look slightly different.)


Now, use your Heat Tool to set the image and make the beautiful metallic colors shine!  Then you can cut the extra cs off, so that your image will be centered on the cs.  (My piece of cs ended up measuring 2 1/8" x 4".)


Add a Basic Black layer behind the image.  (Mine is 2 3/8" x 4 1/4".)


Attach the image to your card base using Dimensionals.  Stamp the greeting with Stazon ink (I used the Teeny Tiny Wishes stamp set), punch out and layer with a larger piece of Basic Black cs.  Pop the greeting up with Dimensionals . . . and you are finished!

Hope you enjoyed this photo tutorial!

Photographic hugs,
Colleen

Saturday, January 28, 2012

Tree Lover!

Hi there all you card making, fun loving people!

It's the Blog Hogger, aka Kathy's sister, here to bring you a little photo tutorial.  I recently bought the Lovely as a Tree stamp set from Stampin' Up.  Yah, yah, I know what you're all thinking: "I can't believe it's taken her this long to buy the most versatile, beloved stamp set in the whole catalogue!"  I can't believe it either.  (You can't see this but I'm hanging my head in shame.  Of course, you also can't see that I'm in my jammies, so I count this as a very good thing.  lol)

Anyway, I've had some fun lately playing with my new stamp set and here's my latest creation:


Here's the lowdown on how to recreate this card:

(1) Cut your Always Artichoke cardstock (cs) at 5 1/2" and score at 4 1/4".  Cut a piece of Whisper White cs at 5 1/4" x 4" and run it through the Big Shot Die-Cutting Machine (p. 215 in the Idea Book & Catalogue [IBC]) using the Finial Press Textured Impressions Embossing Folder (p. 219 in the IBC).  (Am I the only one who questions why the products have to have such
l-o-n-g names?)


(2) Next cut a piece of Whisper White cs 3" x 3 1/4" and stamp the multiple tree image onto the cs.  (Make sure you have the 3" side along the top 'cause you are going to cut the piece into three 1" strips after you've stamped the image.)


(3)  You cut the image into three 1" strips and then back each strip with a slightly bigger piece of Always Artichoke cs. (I cut a piece of Always Artichoke cs 3 3/4" x 4 1/2" and cut it into three  3 3/4" x 1 1/2"strips.)


(4) I stamped the tall evergreen tree on a piece of scrap Whisper White cs, using Versamark and Always Artichoke inks, and embossed it with Clear Emboss Powder.  (All embossing items on p. 201.)  Then I cut around the tree.


(5) I cut a piece of Always Artichoke cs 1 1/4" by 4" and ran the 4" side through the Scallop Trim Border punch (p. 211).  Then I wrapped a piece of Victoria Crochet Trim (p. 194) around the strip of Always Artichoke cs, only using Snail Adhesive on the ends.  Then I cut a shorter piece of the trim and used it to tie a knot on the left side.  (Refer to the picture of the finished card for placement.)


(6) I assembled the card using Multipurpose Liquid Glue (aka Tombo) and popped up the evergreen tree on Dimensionals.  (Adhesives on p. 206).  And then, since I find it extremely hard not to "Gliz Up" my cards, I added Dazzling Details to the trees in the background and Dazzling Diamonds to the evergreen tree. (The Dazzling Diamonds are on p. 201 and for the life of me I can't find where the Dazzling Details are!)  

Here's the pic of the completed card again:


So that's it for now, everyone.  
Have a Stampin' good day . . . and go hug a tree,  
Colleen

Wednesday, January 18, 2012

Gift Reveal!

Good Day Stampers!

Well last night I had a really fun time hangin with my Gnomies lol!  We finally got to do our secret Santa party.  Lots of good food and Sing Star on Play Station.  OK, I have a question for you - How come every song I sing sounds like Opera?  Huh!  Although I didn't do too badly on the duet if I do say so myself although Sherri Lynn rocked the building.  Thanks for inviting me girls.

Now on to the reveal.  I gave this to Tammy last night.  I also made it for my sister, Colleen for Christmas, along with numerous other small things for her to open.  She really likes shiny things and reacts very well to getting anything that is blinged up!  I gave her some of the new Cherry Cobbler Glitter Glue and this -

Ain't it Purty?  Yes I used Lovely as a Tree again.  I find this set to be my go to set for many projects.  The size of the frame is 5" x 7"

I used an old song book that I purchased at a flea market and used this for the music in the background.  It looked very vintage as it had yellowed with age.  Love it.  I stamped the tree image in Gold embossing powder.

I used the Fun Flower die for the Big Shot and ran it through the Petals a Plenty embossing folder.  (What did I ever do without the Big Shot?)  I sponged Champagne shimmer paint on the edges and then sprayed the back of the c/s with water (lightly) and crumpled the layers up one at a time.  I used Dimensionals to separate the layers.  I used a retired snowflake punch and red Glimmer paper for the middle and an Antique brad to finish off the look.  I used a couple of glue dots to attach the flower to the frame.  What do you think?

After I embossed the tree image in gold I used some tombow and randomly dotted the tree and then poured Champagne Glass Glitter on the embossed tree.  It really sparkled.  The picture doesn't do it justice at all.  Sigh!

Last Christmas project.  I was unable to post this as I wanted everyone who got one to have it before I posted.  This was my gift Card holder this year.  I used the long envelopes and added a real red ribbon in the middle.  I added a white layer that I ran through the snowflake embossing folder first then attached.  I made a lollie out of Real Red Designer paper and used the Holiday Lineup stamp set for the middle.  The images are so cute peeking out of the middle of the lollie.   (This is the very last Christmas Post, I know I promised weeks ago but these are not cards so they don't come under the last promise)  I know how to wiggle out of Vows and Promises!   :O)

Glittery Hugs!

Friday, December 2, 2011

Not a Christmas Card

Good Day Everyone!

Today's share is not a Christmas Card!  Yah I know I have been kinda on a Christmas kick since, oooh August, but I thought I would take a short break from all the Christmas related classes and what not that I have been doing since Oct. and share a non Christmas card.

I think I mentioned awhile back that my DH and I went to a friends house for supper and played cards.  While we were playing there was a picture on the wall of trees in a sunset background.  I stared at this picture for most of the evening and the little brain cells were getting quite excited.  I could see a card in my future!  So I came home and the next day I made this card.  Now I wasn't going to share it until I perfected it but hey I am without a share for you today so here goes......

Yes it is the ever present and often used Lovely as a Tree stamp set.  This was just a first draft of the card and I think when I make it again I will definitely widen the strip that I sponged.  The technique is on the right hand side bar under techniques.  I did it with several stamp sets and it never fails to wow.  When I do this again I will post and we can compare. lol.  I used Daffodile Delight, More Mustard, Pumpkin Pie and Cajun Craze ink using sponges.  I like it but I can see it done better.  It's not often I let you see the cards that I consider not good enough hahaha!  I kinda like the pedestal I am on!

Guess by now you are looking at the end of the posts to see the silly jokes I have been posting!  Well you won't be disappointed with this one! 

Oh and one more thing, which I think is soooo funny!  Yesterday my DH went on Facebook and mentioned our anniversary.  His comment was "Celebrating our 39th Wedding anniversary, and if she plays her cards right she can have me for another 39!"  Now I don't know if you catch the irony in this statement but it cracked me up!  As you all know I am really good at cards so we should have a trouble free marriage from here on! 

Chat with you later!  Shaking with Laughter hugs!

Monday, November 7, 2011

Lovely as a Card!

Good Afternoon Ladies!  Well from the looks of the last post from my wonderful sister the contest is on!!!  So I guess after Christmas we will hold a like and like better contest on line to see which one of us out crafted the other.  Nothing like a little sibling rivalry to make your Christmas, right? 

I am glad to see that she reads my blogs faithfully,  I know that when I stumble across one of her posts I have to make sure I have gone to the bathroom first or have on a pair of depends.  (you get it right?)

Well today was clean up from all the classes last week and the weekend so I had a marathon session of stamp cleaning and putting product back in the correct place.  Whew what a job!  So I had all these stamps on my table and as I am cleaning them I am thinking of another card with the "Lovely as a Tree" stamp I had just cleaned.  This set speaks to me at Christmas time like no other.  Don't know what it is about it, maybe I have been conditioned by 38 years of camping at Big Falls, who knows?  But it really doesn't matter, all that matters is you get another photo tutorial.

Here are your pieces and dimensions.  I stamped and embossed the Lovely as a Tree image before hacking it up into smaller pieces of 1" each.

Here is it I just put a little of Snail tape on it to show you what it looked like before cutting it.  Oops one step ahead of myself.

I glued the Soft Suede and Baja Breeze c/s together leaving a border and then I placed the image on the Baja Breeze c/s and left some openings in between.  This is what the snail tape is good for because you can always move them to line them up properly.  When I have it where I want it I then use Tombow glue.

I used Baja Breeze ink and a snowflake from Serene Snowflakes to stamp on my card in a random manner.

Then I cleaned up the stamp and used the embossing buddy and some Versamark ink and put iridescent Ice embossing powder on the other random snowflakes.  I then heat set this with the heat tool.

I mounted the Focal image on to the card using dimensionals.  Looking Purty right?

Ok now for the fun stuff.  I wanted to use the new Shimmer Paper that I have in White and make my greeting for the card but it was too white.  So I ----- yes I did -----------I sponged some Soft Suede onto the punched out piece and lookee it is darker.    OOOOHHH!  NICE!  You have to pounce on the piece because if you try to flick or drag the sponge - well lets just say - You can't flick or sponge, you have to pounce on it.  Or it might get away!  But it does look lovely.  Now to finish off the card.

I mounted the sentiment onto the fixed punchie with dimensionals and then tombow glue to affix it to the card.  Not bad. 
I quite like it!  So that's it for today ladies, Iridescent and embossed hugs!  Oh and Colleen don't worry too much honey cause I'm gonna win anyway so,  do you need the address to a Dollar Store?  (I'm a BAD puddy tat!)

Tuesday, November 1, 2011

Hello From the North Pole!

Well hello everyone!  Just like that Winter has set in.  I had a class on Sunday - we did the Snow much Fun projects and I guess we must have played with snowmen for too long because by Sunday evening we had a foot of snow.  It was crazy!  It actually looked like January with the winds howling and the snow falling.  Yech!!!  I know some of the crazy Newf's around here love to Snowmobile  (skidoo) but for those of you who don't even know what this machine is, I envy you.

I have several shares for you today. At my class on Sunday, one of my stampers brought her daughter and it was her b-day. Her mother had ordered Pony Party for her and I asked if I could make the gift bag. So I used the stamp set and made a cute gift bag. I got the idea for the layout and the wings from Shauna Mackenzie. So here is the gift bag -


Isn't this the cutest thing!  Click on the pic for a closer look at the wings. 

And I spent some time updating the Technique's class that I have on Nov. 2nd.  I posted this pic a little while ago and wasn't sure I liked it cause it was too light.  I like it dirty - get your minds out of the gutter and while you are climbing out, if you see Brain there please send home to me I miss her!

This is the one I like better.

I used Old Olive, Always Artichoke and Early Espresso ink.  I also changed the back of the card to Very Vanilla instead of Whisper White.  I dragged the Versamark ink pad around the edges of the focal image and heat embossed in Gold.   What do you think?

This is the second card for that class using the Faux Mother of Pearl technique.  Once again Bells and Boughs and some pearls.  Soft Suede ink and some lovely random stamping on Glossy card stock.  Ohhh!  It makes me shiver I like it so much!  (maybe it's the Arctic temperature in this blankety blank house)


This one I just did some random snow flakes above the trees.  It looked too bare for my liking. 

Now for some business - Stampin' Up is extending the Big Shot promotion until Nov. 11th. so if you were hemming and hawing you still have time to take advantage of this amazing offer.  I would love to have you on my team!

Also it's a great time to be a hostess.  Stampin' Up! will give their hostesses an extra $45.00 if you host a workshop of $450.00 from November 1st to December 15th.  That's on top of the hostess benefits of $70.00 already located in the current catalog  So if you don't have math skills or a calculator in front of you that a total of $115.00 in free merchandise.  The information is located on the right hand side of this blog.  Just click on it for more details. 

So that's it for today, thanks for visiting with me and reading this looong post!  Colleen, I don't know what you were drinking the other evening (Colleen doesn't drink but sometimes I swear I'm not so sure) but your post was too funny!  Thanks for the wonderful information and yes you are a Blog Hogger!  But you are so good at it, don't stop now!
Shivery Hugs!