Showing posts with label 3D projects. Show all posts

Saturday, October 24, 2015

Wrappin' it Up!

Hello there Stampers!

I hope you  have been enjoying the posts!  Thanks Colleen for the Wine Necktie post!  From here on in I will call it a Wine Necktie!

One of my demonstrators and myself will be participating in a Craft Sale at the Pepsi Center on December 5th.  I have been busy creating stocking stuffers and gift card holders and wrapping up candy etc.  Having so much fun doing this.  I have been using some of my retired craft supplies and some of my retired stamps.

I have found that I am enjoying the older sets.  And over the next couple of weeks I will be showing you a few of the projects I have worked on.  But today I have a super cute post using almost all current product.  It didn't start that way, it just evolved.  Love it!  Have a look -


I know you are all familiar with our new Christmas Designer Series Paper called Home For Christmas!  So this is what I started with!


Yes, I did, I cut out all the deer on one sheet!  I know, I've lost it right?  It was not too bad and now that they are all cut I can use them as I want.  So really pleased to have done all of them instead of one at a time lol.


Recently I ordered these bags with an idea to use them for Christmas goodies!  They are on Page 151 of the new catalog and are called Sketched Dots Tag a Bag gift bags.  I really like them and wish I had purchased more.  They are a little translucent and I love the way they fold !  I broke out the Christmas Cuties stamp set and went to work.  


I did use a retired medallion die for the top.  I added Mint Patties to the bag, folded the top and stapled it shut.  Then I folded the Medallion over the top.  I used the new Cotton Paper on Page 148 because it is so flexible.  It is a step up from Tissue Paper.  

I added  Tip Top Taupe Lace Ribbon and tied it on the top.  I then used Linen thread to tie the tag on the top of the bag.  I used the Silver Glimmer Paper for the tag and coloured the the Angel in Pool Party, Tempting Turquoise, Soft Suede and Blushing Bride.  Popped her up on Dimensionals.  Love this look.  Now you know why I wish I had more lol.


Here I used a paper doily to over lap the top and I used candy bars that I wrapped in Christmas Paper.  Added a Watermelon Wonder Tag and Ribbon.  Added a retired snowflake in Silver Glimmer Paper and one of the cute Deer.  Bamm!  Done!


Same thing just a different Deer!


Going through my UFO box I came across these skates already cut and coloured.  Yay for me...  So I added Cucumber Crush Lace ribbon and a circle in the same colour and popped up the skates.  The flip side on all of these says - To:  From:


Well that's my share for today!  Hope you enjoyed it!

Crushing on this project hugs!


Friday, April 3, 2015

Another Everybunny card!

Hey there Stampers!

Today I am playing in the craft room.  Yes there are lots of other things to do but hey I don't want to do housework!  So card making it is!

I know you all understand my mind set, as I am sure if you have a day off from your real job you don't want to wash dishes and do laundry. lol

I have another Everybunny Card to share with you today.  I sent this one to my sister in Nova Scotia for Easter.  You may recognize the layout lol.  I found a layout I liked and am going with it.  Just changing up the stamp.

Hey if it ain't broken don't fix it right?   So have a look at today's card -

 
Stayed with the same colors, Garden Green, Elegant Eggplant, Wisteria Wonder and Pink Pirouette!  I did use the fern from Butterfly Basics to fill in the bottom.  I also broke out the Fringe scissors to make some grass just under the bunny. 

 
I stamped and colored the bunny and then fussy cut him out and popped him up with dimensionals.  The mushrooms were also cut out and popped up.  I added a small amount of Dazzling Diamonds to the egg and the mushrooms.  I used a retired itty bitty punch to do the flowers.  When I make cards for  my family I don't mind using retired products. 
 
But again any stamp will work so don't be caught up with current and retired. lol
 
I also have been working on a wedding shower banner!  I was commissioned to do a banner in Crumb Cake, Pink Pirouette and Gold.  It is an East Indian wedding so they wanted lots of bling and gold.  I hope I managed to get it right.
 
Have a look and remember the pictures don't even come close to catching the gold and shimmer.  Sigh!
 
 
Unfortunately I can't get the whole banner in one picture so I thought maybe showing some of the elements will give you an idea of where I went with it.  I used the Big Shot to cut out the largest scallop oval.  I then used the Encore Gold ink pad to brush on some gold ink which I embossed with Gold Embossing Powder.  The next oval was punched out in Pink Pirouette. 


I used the swirl from Everything Eleanor, which I stamped off using Crumb Cake ink.  I also used the small flower and the larger one from that set.   I embossed the flowers in Gold Embossing powder.  I used the Bird Builder Punch and Garden Green to get the leaves.  In the center of the flowers I placed a Rhinestone.  I purchased the Build a Banner set last Christmas and I must say it has been used over and over.  I embossed the letters with Gold Embossing powder by pouncing Versamark over the letter stencils.  I used a Sponge Dauber for that.  Smaller than a sponge so you can control the stencilling. 


Another one of the words.

I used Gold foil and the Butterfly framelits from Butterfly Basics to make these beauties.  I used these butterflies to make a space between the words.  The larger one goes at the beginning and the smaller ones are between the words.


A look at the smaller flower from Everything Eleanor.


This is the larger Butterfly.  I used the smaller Butterfly framelit to go in the center and added some Bling by using Rhinestones. 


This is a picture of some of the banner.  It actually says - Come Have Tea with the Bride to Be!  It will be on two lines as it was too big for one banner.  So four words per string. 
 
What do you think?  It was a lot of work but I really enjoyed making it.  Now I just have three more banners to make for the same wedding.  lol.  But I have a bit of time so I'm not worried.
 
Long post today but I wanted you to see what I was up to. 
 
Springy Hugs!  And Happy Easter EveryBunny!
 

Wednesday, May 14, 2014

Everything Eleanor and Paper Pumpkin!

Hi there Everyone!

I am having a crafty day!  I am sitting in my craft room and I finally got a chance to haul out my April Paper Pumpkin!

This kit was all about Moms but I had already sent my Mother a gift so I decided to make it all about me!  ( I am a mom so I guess that works )

The frame is a blank canvas and I decided that I wanted something that would be timeless.  So here's what I've got for you today -

 
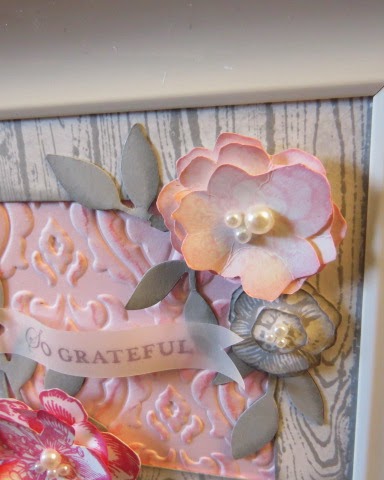
I went with some classic colors to make my insert for the frame.  I used "Everything Eleanor" for the flowers and the lovely weathered board is the fab stamp "Hardwood".  You will find this stamp in the Spring Mini.  It will be carried over to the new catty so it is a "must have" stamp for the up coming stamping year. 

 
The colors I chose were Pink Pirouette, Strawberry Slush and Smoky Slate.  I stamped the Hardwood on a piece of Whisper White card stock and then sponged the Smoky Slate around the edges and softly all over the card stock.  This gave it a lovely weathered look that I love.
 
I then stamped out the flowers in the "Everything Eleanor" set three times in Pink Pirouette, and the smallest flower three times in Smoky slate.  I punched out the leaves using the sizzlet die (retiring) Little Leaves in Smoky Slate card stock and did a little sponging on the edges.  I then cut out the flowers and used a paper tole look on the flowers.  I cut off some of the petals and then layered them onto the other stamped flowers.  I used dimensionals to raise the design. 

 
Here is a look at the sentiment and the largest flower.  I stamped this one in Strawberry Slush ink and again cut out the flower like  paper tole.  I added some pearls to the flowers and sponged around each layer to add some depth.  Inside the "Hardwood" cut out I used Pink Pirouette card stock and the Beautiful Baroque Embossing folder.  I dragged Pink Pirouette ink over the card stock lightly.  I added the sentiment "So Grateful" stamped in Basic Gray on Vellum.  This greeting came from
"Apothecary Accents"
 
I chose So Grateful because at this time in my life I am so very grateful.  I have an update on my recovery!  I saw my surgeon yesterday and I am now under no Limitations, well except for what my body places on me.  So I can resume my life and get back to doing what I love to do. 
 
I start Physio next week and will do a 6 to 10 week course to get me in shape.  I have been very sedentary for quite awhile and can't wait to get into some modified exercise. 
 
This photo frame will look lovely in my room and remind me every time I look at it exactly what I have in my life. What do you think of this project?  Drop me a line and let me know! 
 
 
Everything hugs!
 

Sunday, April 6, 2014

Pop-Up Box Card....Man Style!

Hi everyone!

It's the Blog Hogger coming to you with a super cute pop-up box card, with a manly theme! Of course, there are women out there who also love, love, love to golf but this card was made for a manly man! Therefore, the colors reflect that and there are no butterflies, glitter, or girlie things anywhere to be found.

Check it out:


In the order they are in the card, there's grass, a golf club, shoes, a flag, a golf ball and a golf bag!

Here's a side view:


And a closer view from the top:


The golf ball is my favorite element because it moves! So cute! Ummm, I mean how manly!!! lol Because it can be seen from the front and back, two balls were used with the acetate between them.

And yes, folks, this card folds flat so it can slide into an envelope!

And now for the details:
  • The base of the box card was made from a 12" x 12" sheet of Basic Black cardstock.
  • Follow the instructions from Splitcoaststamper for how to make the box:  http://www.splitcoaststampers.com/resources/tutorials/popupboxcard/
  • Gray designer paper was used to cover the outside of the box. Red designer paper was used for the inside flaps and the inside back portion. (It's outdated Stampin Up designer paper.)
  • Whisper White, Old Olive, So Saffron and Smoky Slate cardstock were used for the added elements.
  • The stamp set used for the sentiment is Best of Birthdays, from Stampin Up's Best of 25 Years series. 
  • Punches used were Large Oval (for the shoes), Extra-Large Oval and Word Window (for the golf bag), 1/2" Circle (for the ball), Petite Pennants Builder (for the flag). 
  • Embossing folders used were Perfect Polka Dots (for the ball) and Square Lattice (for the flag).
  • Extras: Clear acetate to hold the ball in the air, black ribbon to attach the handle to the golf bag, and a brad in the middle of the pocket on the golf bag. A Basic Black marker and a White Gel Pen were used to make the laces on the shoes.
Keep the faith, people! Spring will eventually arrive and golfing season will be upon us! :)

Golfing hugs,
Colleen

Sunday, March 23, 2014

It's SPRING!!!

Hi, everyone!

It's the Blog Hogger here, coming to you with an abundance of springtime cheer! Now, don't get me wrong. Here in our neck of the woods the only sign of spring is...well, me making a card that is enthusiastically spring-like! Otherwise, we are still up to our necks in snow and cold weather. But I think I saw a robin the other day! How exciting is that??? Of course, he was wearing a winter coat, boots, gloves, woolly hat, and a scarf! lol

Macleans.ca stated in their article "The Winter That Ruined Everything" that Stephenville had the most snow this winter in all of Canada. Yah! We win? lol Therefore, it's completely understandable why I went over the top when I made this birthday card for a close friend of mine. :)

Here it is:


Isn't it cheerful? There's space on the back for a personalized sentiment. Here are a couple more pictures:


This shows more of the side. The butterflies are attached to thin strips of clear acetate so they stand above the flowers and move slightly when you open up the card.


And this gives you more detail of the top elements. The shocking part is that the card folds flat so you can put it into an envelope!

I used a tutorial from Splitcoaststampers to make the box shape:  http://www.splitcoaststampers.com/resources/tutorials/popupboxcard/ The only change I made was to cut the flaps for the front strip (the section with the pink flower in the middle and the purple ones on each side) a bit smaller. I didn't find there was enough space between the two sections to showcase the flowers I chose. Check under the details given below for a note about the measurements I used.

And I have to give a huge shout-out to Kathy for introducing me to a Pop-Up Box Card. That's what she used for my Christmas card and it was absolutely gorgeous!!! Check it out here: http://inkinbythebay.blogspot.ca/2013/12/happy-new-year.html

Details;

  • This card fits into a standard A2 envelope, albeit extremely tightly. (I will be putting this one into a slightly larger envelope, but at least it gives you an idea of the size.) I used the measurements given at the bottom of the tutorial under "Variations" because I didn't have any 12" x 12" cardstock I wanted to 'ruin' on my first try doing this type of card. The joke ended up on me since it all worked out fine. lol
  • Stamp set: Secret Garden and On Your Birthday (for the sentiment)
  • Cardstock: Crumb Cake, Wisteria Wonder, Old Olive and Whisper White
  • Ink: Blushing Bride, Daffodil Delight, Old Olive, Melon Mambo (sponged on the edge of the pink section behind the sentiment) and Elegant Eggplant (sponged on the edges of the purple flowers)
  • Extras: Secret Garden Framelits, Little Leaves Sizzlits, Boho Blossoms (purple flowers) and Curly Label (sentiment) punches, markers (Basic Black for the centers of the yellow flowers, Melon Mambo for the centers and edges of the pink flowers), Rhinestone Basic Jewels, Dazzling Diamonds, clear acetate for attaching to the butterflies and Stampin Dimensionals
Flower-filled spring-like hugs,
Colleen

Thursday, February 20, 2014

I Finished it!

Good day Everyone!

Thank you Colleen for the last post!  There is always a reason for you to post!  I love that I can take a bit of a break from everything and not feel like I am letting my followers down.

With that being said I am still playing around with paper.  Lol.   I knew I would be out of the loop for awhile and before surgery I purchased the wreath kit, Burlap and Blooms, in the new Occasions Mini that was released in January.  I have been puttering around with it for the last couple of weeks and I finally got it finished.

Have a little look -


This is the finished wreath.  I love it.  It was a bit of work but most of the cutting and that was done by SU!  Thank goodness!


Here is a little close up of the flowers from the kit and my roses and leaves.
 

I of course, just had to add my little spin on this Kit!  I added six rolled roses and some hand cut Gumball Green card stock.  I just felt that it needed a bit more lol.  What do you think?

I used the new die in the Occasions Mini that actually cuts the card stock for you, all you have to do is roll and glue.

I also signed up for Paper Pumpkin,and that arrived yesterday!  Can't wait to get into that box!

 Stampin' Up! has decided to extend the FREE MARKER special until March 31st. So if you didn't get in on this deal you still have time!

Now I just have to post these couple of pic's - I so hope you don't mind :O)


This is one part of my Recovery team that is working hard to get me back to myself.  Miss Emily is fresh out of the bath and mommy is trying to blow dry her hair.  It is all curls!  So dang cute!


In order to get the desired look mommy has to show music videos to keep her attention.  We are hoping that will change as she gets older. lol.

Leave a comment and let me know what you think of the kit! 


Well that's it for me!  Not very short and but hopefully sweet!

Creative Hugs!